GegoK12 – Settings Module Manual
Step – Step guide
Introduction to the Settings Module
The settings Module is the backbone of the GegoK12 School Management System. It allows administrators to configure school-wide foundational data, academic structures, admission flow, exam rules, holiday lists, and operational policies. This module ensures that the entire school system runs smoothly with accurate, organized, and centralized information.
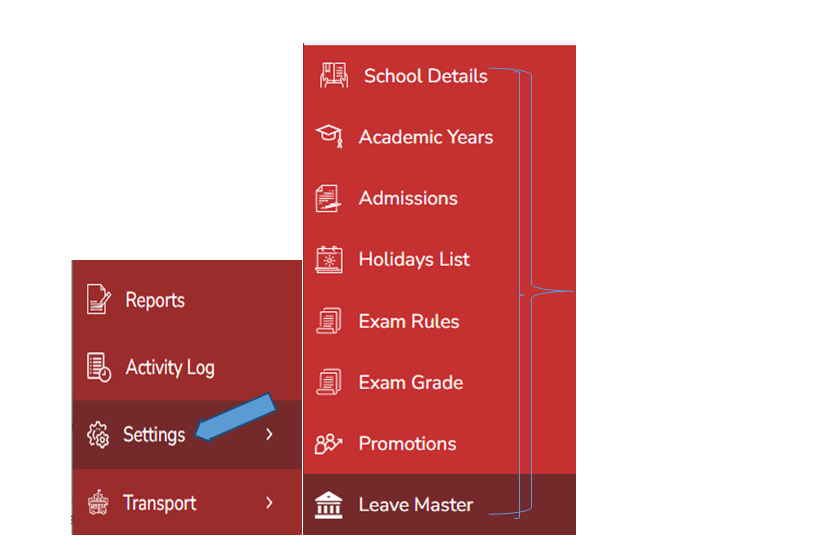
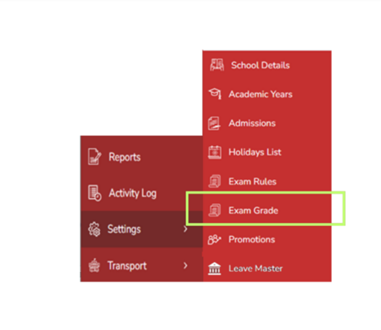
Accessing the Settings Module
From the left-side navigation panel:
Click → Settings
This opens the list of core configuration options:
- School Details
- Academic Years
- Admissions
- Holiday List
- Exam Rules
- Exam Grades
- Promotions
- Leave Master
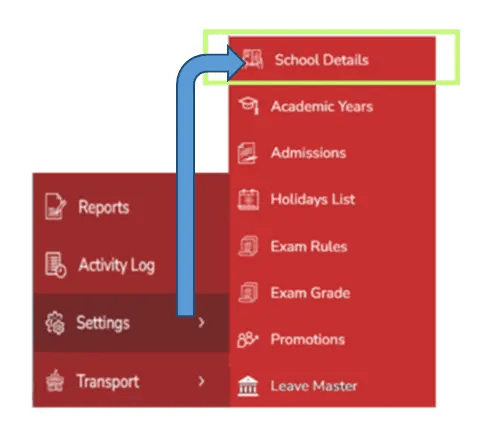
School Details
Purpose of School Details Module
The School Details section stores essential information about the institution. These details sync across all roles (Admin, Teachers, Parents, Receptionist, Accountant, Librarian).
Steps
- Click Settings → School Details.
- Enter all mandatory information:
- School Name
- About Us
- Admission Open/Close Status
- Admission Close Message
- Affiliation Number
- Affiliated Board
- Date of Establishment
- Landline
- Motto
- Logo
- Website
- Address
- City, State, Country, Pincode
3.Click Submit to save.


Editing
- Click the Edit button in the top-right corner to update the school details at any time.
Admission Status Note
Open Tab : Indicates whether online admission is active or inactive.

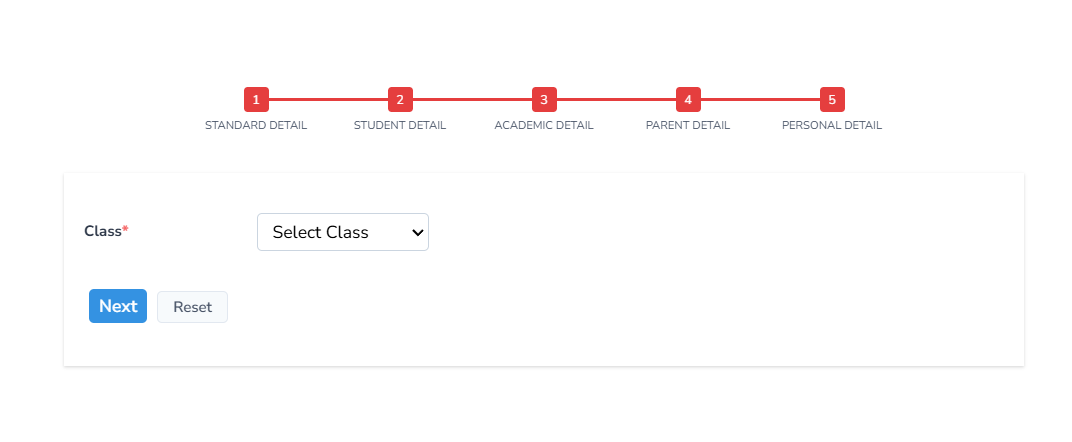
Viewing the Online Admission Form
-
Click View → The admission form opens.
-
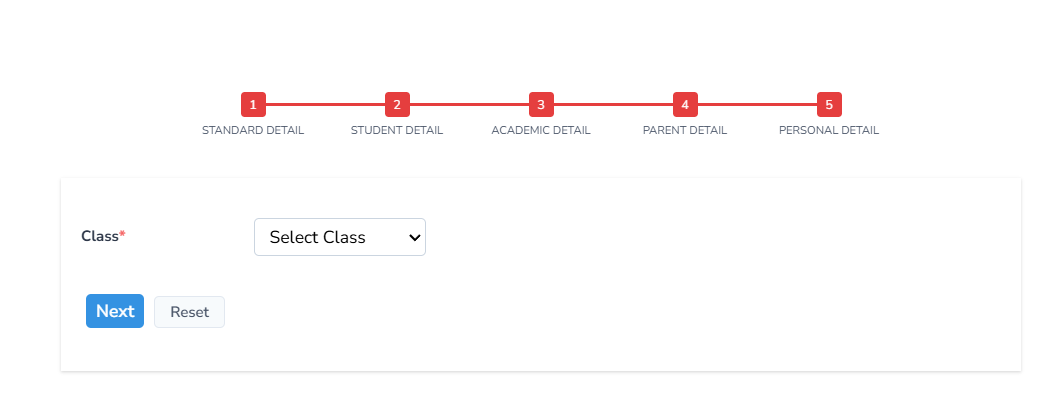
It includes 5 steps:
- Standard Details
- Student Details
- Academic Details
- Parent Details
- Personal Details
The school details information will be displayed in the Teachers & Parent App once they login with their credentials.
Online Admission Form Sections
Use of Online Admission Form
-
Allows parents or administrators to capture complete student information digitally.
-
Reduces manual entry, improves accuracy, and streamlines admission workflow.
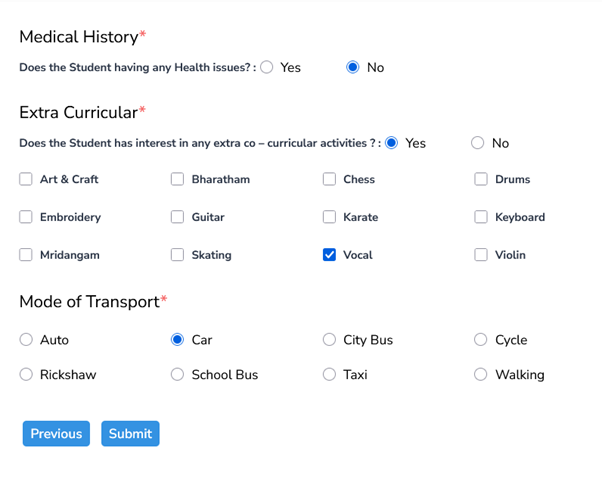
Standard Details
- Select the admission class and click Next.
Student Details
Record:
- First Name, Last Name
- Photograph
- Date of Birth
- Gender
- Height, Weight
- Birthplace, Nationality
- Identification Marks
- Sibling details (Yes/No)
Click Next.


Academic Details
Record:
- Last exam marks
- Board of study
- Choice of language
Note:
Group selection and board registration apply only for Grade X, XI & XII.

Click Next.
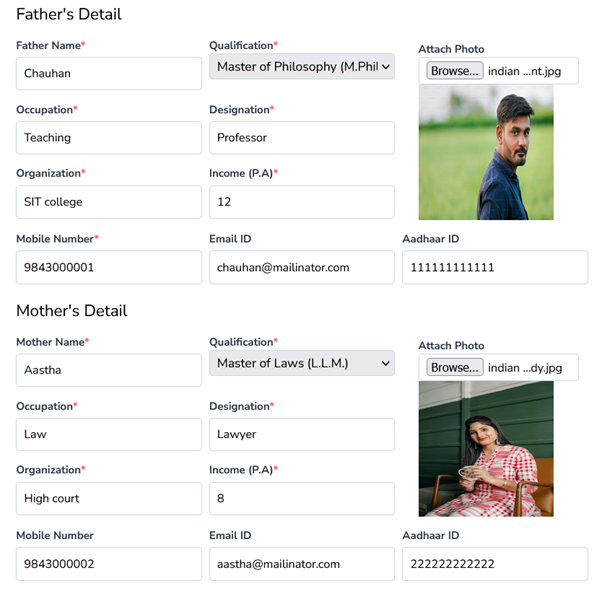
Parent Details
-Record all parent/guardian information.

Personal Details
Complete remaining personal information.
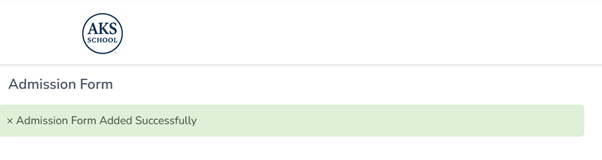
After submission:
A new application form is successfully added.
Additional Notes for School Details
- School information can be edited any time.

- Admission status can be set to Active/Inactive.

-
You can reset all details using the Reset button.
-
School details appear in the Teacher App and Parent App once they log in.
Academic Years
Purpose
This section manages academic year timelines and classifications (current, new, old).
Steps
- Go to Settings → Academic Years.
- Click Add (top-right corner).
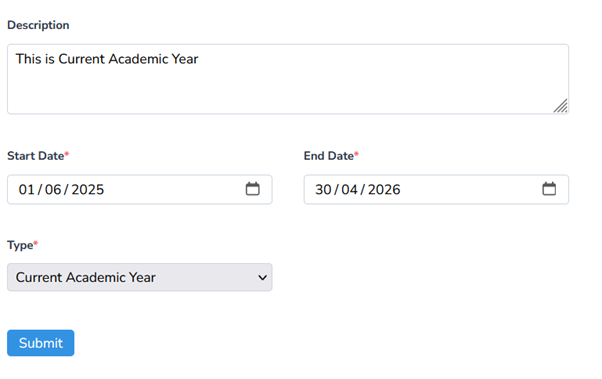
- Enter:
- Description
- Start Date
- End Date
- Type (Current / New / Old Academic Year)
- Click Submit.

Available Actions
- Edit
- View
- Delete

Note: The details can be edited from the action menu
![]()
Note: The details can be edited from the action menu
![]()
Note: The details can be edited from the action menu
![]()
Note
- Details can be reset when needed.
Admissions
Purpose
Lists all online admission forms submitted via Admin.
Steps
- Go to Settings → Admissions.
- View:
- Application Number
- Name
- Class Applied
- Application Status
- Action options


The online student admission form filled by the administrator will be listed here. The details such as Application Number, Name, class applied for,application status, action will be displayed.
The application status can be changed by the edit tab. The Application status has pending, rejected and approved status


Application Status - Pending (BUG )
Change the status to pending and click submit
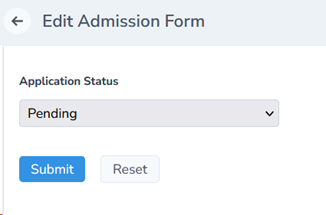
Application Status - Rejected
Change the status to Rejected and click submit

Application Status – Approved
Change the status to Approved, record all the details such as section,fee type, Admission fee –paid /unpaid and click submit. The student will successfully get enrolled. ( How will we notify the parent about the enrolment )

Holiday List
Purpose
Allows admin to set all school holidays for the academic year.
Steps
- Go to Settings → Holiday List.
- Click Add (top-right).
- Enter holiday details.
- Click Submit.
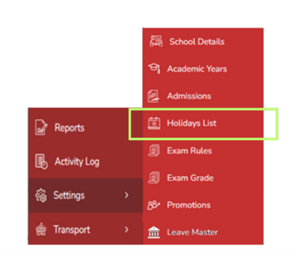

- Click Holiday List and then Add from the top-right corner.
- Enter the holiday details for the current year and click Submit.
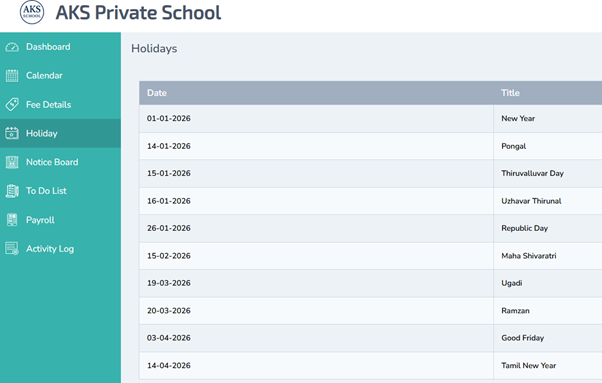
Holiday List Reflection in Teacher’s Profile
Login as a Teacher with the credentials given by the admin. To check how to login Click
Go to Dashboard ----- Holidays (The list of holidays will be displayed)

Holiday List Reflection in Student’s Profile
Login with the App credentials in the mobile App or login in the web Click Holidays on the left pane of the dashboard ------ (The list of holidays will be displayed)

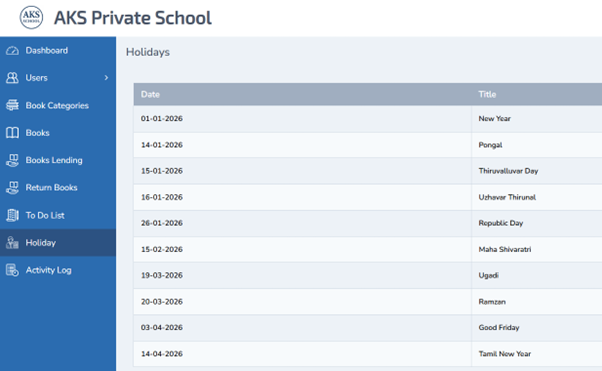
Holiday List Reflection in Receptionist ’s Profile Login with the credentials in the Receptionist’s Login and click Holidays Holidays ------ (The list of holidays will be displayed)

Holiday List Reflection in Accountant ’s Profile
Login with the credentials in the Accountant’s Login and click Holidays
Holidays ------ (The list of holidays will be displayed)
Holiday List Reflection in Librarian ’s Profile
Login with the credentials in the librarian’s Login and click Holidays
Holidays ------ (The list of holidays will be displayed)
Exam Rules
Purpose
Defines the scoring boundaries used for grading calculation.
Steps
- Go to Settings → Exam Rules.
- Enter:
- Grade Name
- Minimum Score Percentage
- Maximum Score Percentage
- Click Submit.
Note: These rules help auto-generate grade calculations.


- Record exam rules by entering the Grade Name, Minimum Score Percentage, and Maximum Score Percentage.
- Click Submit to save.
- These rules will automatically assist in grade calculation.
Exam Grades
Purpose
Displays the list of graded brackets defined for assessment.
Steps
- Click Settings → Exam Grades.
- View the preconfigured exam grades.
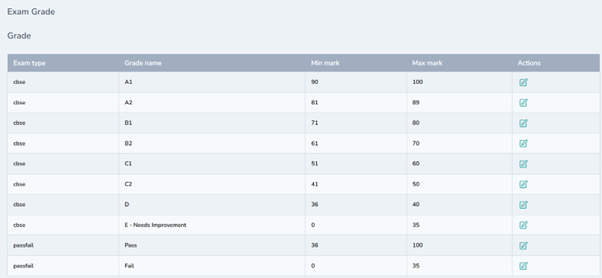
- The list of exam grades configured will be displayed here for reference.
Promotions
Purpose
Manages promotion workflow from one class to the next.
Important Note
- Before promotions, ensure Exam Module is properly set up.
- Reference guide:
Open the Exam Management Guide


 The promotion list for Grade II A can be downloaded in the excel sheet.
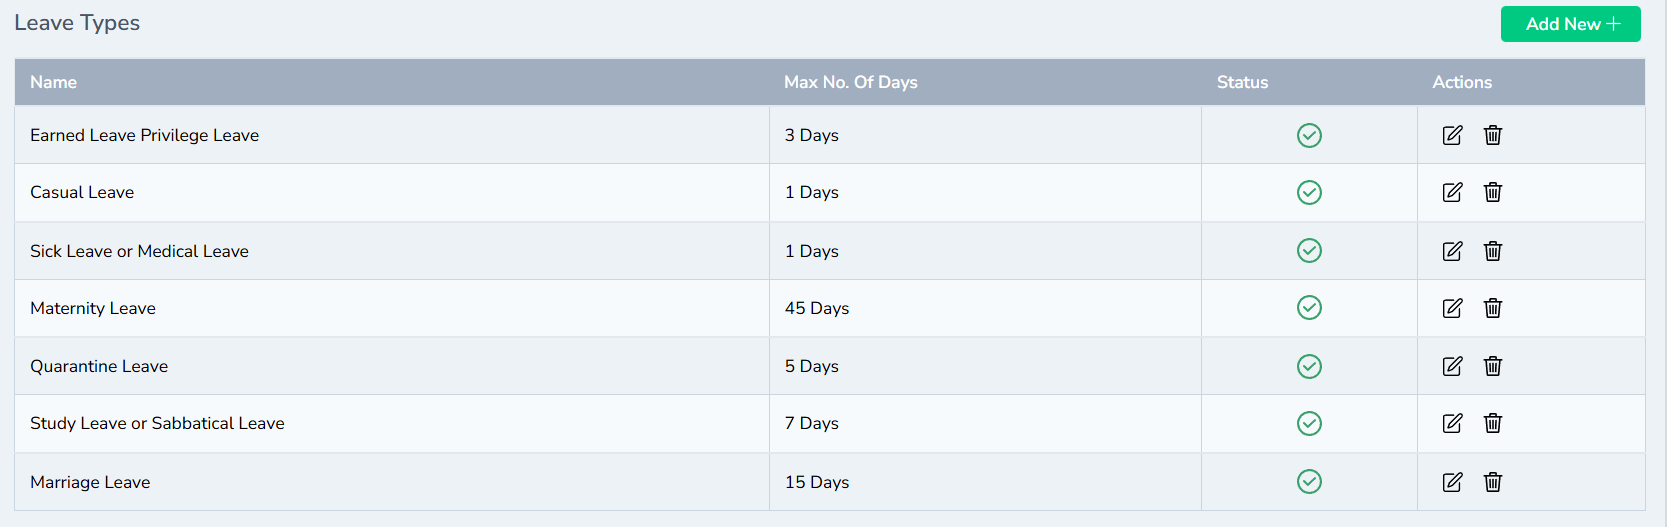
Leave Master
Purpose
Defines leave categories applied across staff roles.
Common types:
- Earned Leave
- Casual Leave
- Sick Leave
- Maternity Leave
- Quarantine Leave
- Study Leave
Steps
-
Go to Settings → Leave Master.
-
Click Add New (top-right).
-
Enter:
- Leave Type
- Maximum Days
- Click Submit.
Full Leave Module Reference
 Define different leave types for clarity, such as Earned Leave, Casual Leave, Sick Leave, Maternity Leave, Quarantine Leave, and Study Leave.

- Click Add New from the top-right corner, enter the leave type and maximum number of days, and click Submit.

Conclusion
The Settings Module ensures that your institution’s operational foundation is properly structured. By configuring these settingss// correctly, all other modules (Admissions, Fees, Payroll, Staff, Academics) will function smoothly with accurate and centralized data.