GegoK12 Staff Management Module
How to Add a Teacher
Complete Step-by-Step Guide for Admin & Staff
Overview
The GegoK12 User Management Module allows administrators and authorized staff members to efficiently manage teacher profiles. This guide provides a complete walkthrough on how to add a new teacher into the system, including personal details, qualifications, notes, and address information. Follow the steps carefully to ensure accurate entry and smooth onboarding.
1. Accessing the User Management Module
Step 1: Navigate to the Teaching Staff Section
-
Go to Users → Staff → Teaching.
-
This section displays all existing teachers registered in the system.

2. Creating a New Teacher Profile
Step 2: Click on Add
- On the top-right corner, click Add

- A new teacher registration form will appear.
3. Entering Teacher Profile Details
Step 3: Fill in Basic & Personal Information
Record all necessary details, including:
- Full Name
- Email ID( it is important to login into the teacher profile)
- Phone Number
- Aadhar Number
- Employment ID
- Date of Birth
- Other relevant staff information
Ensure all mandatory fields are completed before moving to the next section

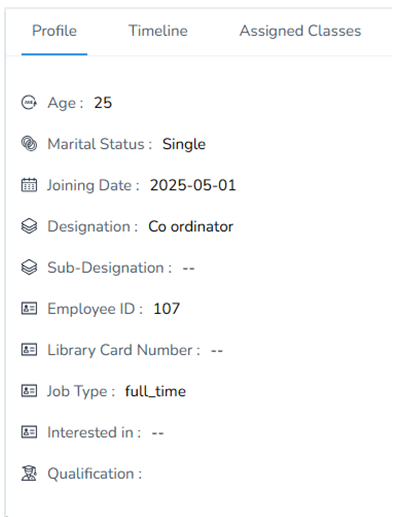
4. Adding Educational Qualifications
Step 4: Enter Qualification Details
- Provide complete educational background of the teacher.
-Include degree names, specializations, certifications, and institution details.
- Click Submit to save and proceed.
A new tab will open after submission.

5. Recording Notes & Additional Information
Step 5: Enter Notes
-
Add important remarks relating to the staff member.
-
These may include internal notes, special instructions, or HR-related information.
-
Click Submit to save the notes.
A new tab will open after saving the notes.

6. Recording Address Information
Step 6: Enter Address Details
Fill in the teacher's complete residential details including:
- Address Line
- Country
- State
- City
- Pincode
Click Submit after completing all fields.

7. Successful Profile Creation
Step 7: Final Confirmation
Once all details are submitted:
-
The teacher’s profile is successfully created and saved in the portal.
-
You can now view, edit, or manage the teacher’s profile from the Teaching Staff list.
Your teacher profile setup is now complete!

8. How to Filter & Search Options for Teaching Staff

When viewing the Teaching Staff list, administrators can efficiently locate specific teachers using the built-in filtering tools:
Search Bar
-
Allows the admin to search teacher profiles using keywords such as name, ID, email, or phone number.
-
Helps quickly locate specific staff members in large institutions


Alphabetical Filter
-
Displays buttons from A–Z for easy alphabetical filtering.
-
Clicking a letter shows all teachers whose names begin with that letter.


- Ideal for quick navigation through long staff lists.
These filtering tools help streamline staff management and improve admin efficiency.
9.How to Import & Export the teacher’s details
When you reach the Teaching Staff list page, you will find additional bulk management tools next to the Add button:
2a.Import Teachers

This feature allows you to upload multiple teacher profiles at once.
-
Click Import.
-
Download the system-provided sample file.
-
Fill in all teacher details such as Name, Email, Mobile Number, Department, Aadhar No, Employment ID, etc.
-
Upload the file back into the portal.
-
The system validates the data and displays any errors that need correction.
-
Once validated, all teacher profiles are added instantly.
2b. Export Teachers

This option helps you download the existing teacher list in bulk.
-
Click Export.
-
The system downloads the teacher database in Excel/CSV format.
-
Useful for data backup, audits, HR documents, or verifying staff records.
These import/export tools make large-scale data management efficient and minimize manual entry work.
2c.The ID Card can generated in seconds by clicking ID card. The ID can also be printed.


10. How to add Attendance by the Admin
The admin can mark the attendance using the attendance tab. Fill all the details such as date, session, reason and remarks and click save and submit. The same will be reflected in the teacher’s profile….
For more info ( Check how to add the attendance link)

11. Additional Profile Tabs
The admin can add the Additional Profile Tabs (After the Teacher’s Profile Is Created)
Once the teacher’s profile is saved, several tabs become available for further management of the teacher’s information in the admin dashboard.
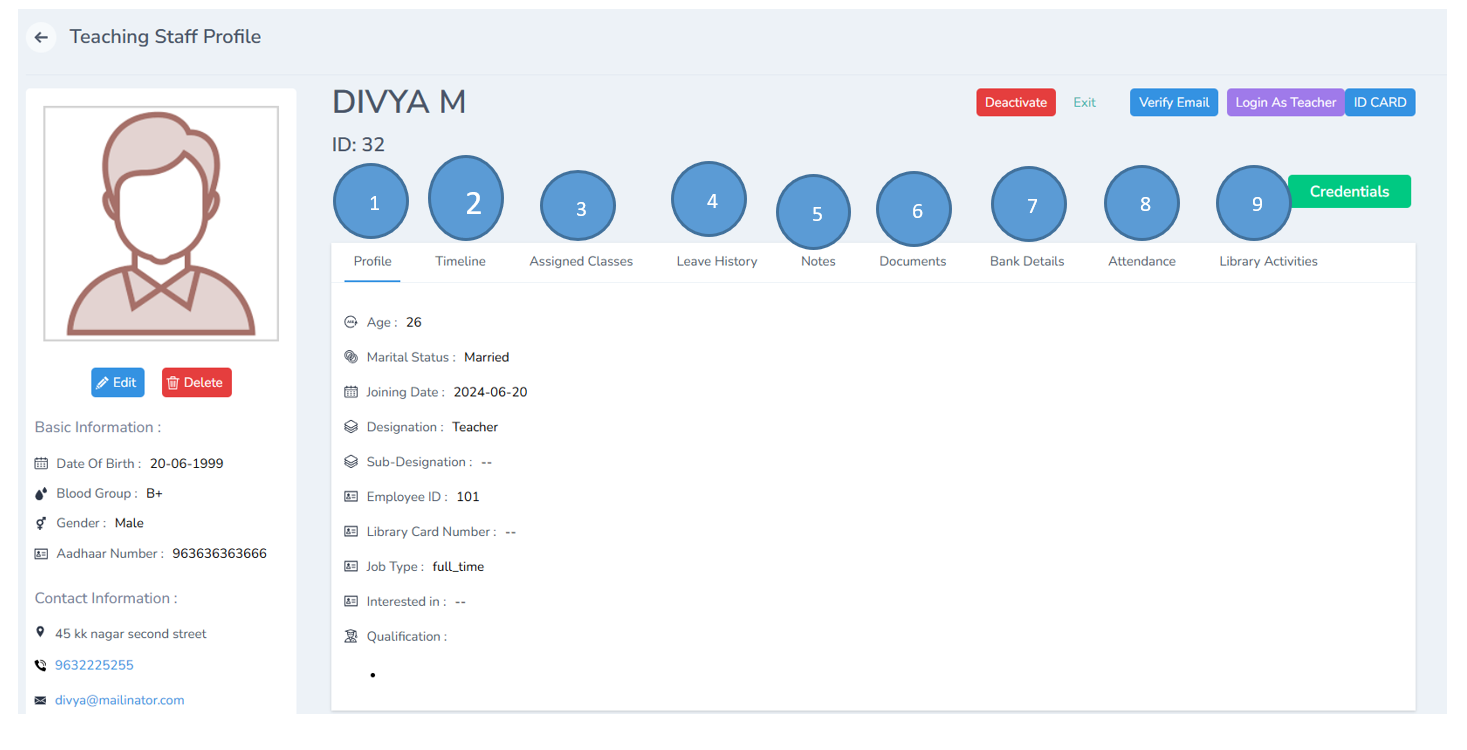
Profile
Displays all basic personal, professional, and contact details of the teacher.
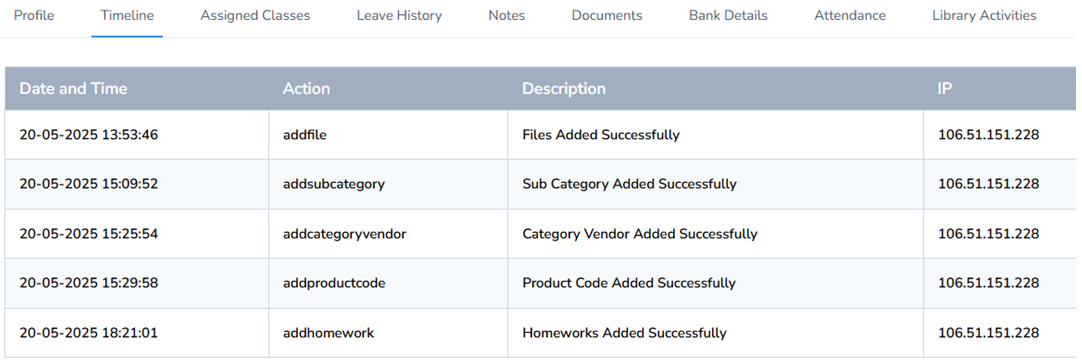
Timeline
Shows chronological activities and updates related to the teacher, such as profile edits, class assignments, document uploads, etc.
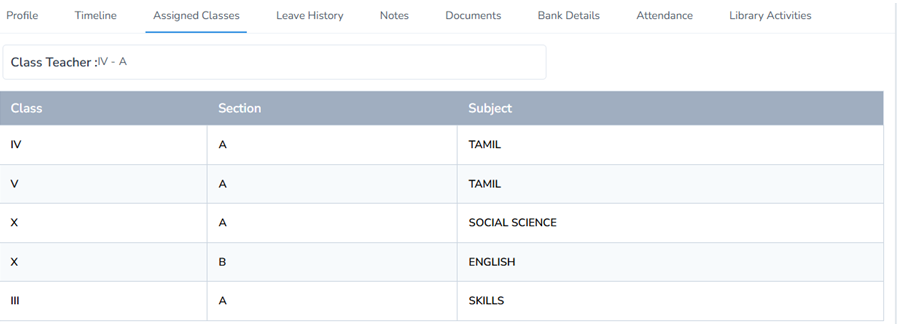
Assigned Classes
Lists all the classes, subjects, and schedules assigned to the teacher. Helps administrators quickly verify teaching responsibilities.
Classes can be assigned by the admin. Click the link for the detailed tutorial
Open the Class Section Management Guider (opens in a new tab)
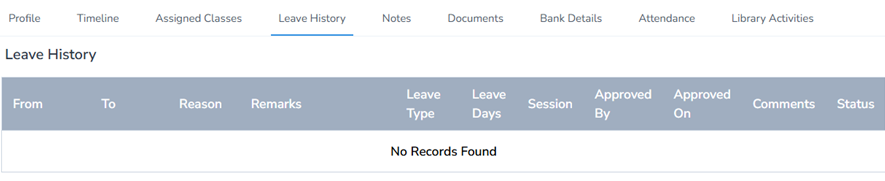
Leave History
Displays all approved, pending, and rejected leave applications submitted by the teacher. Useful for attendance and payroll management.
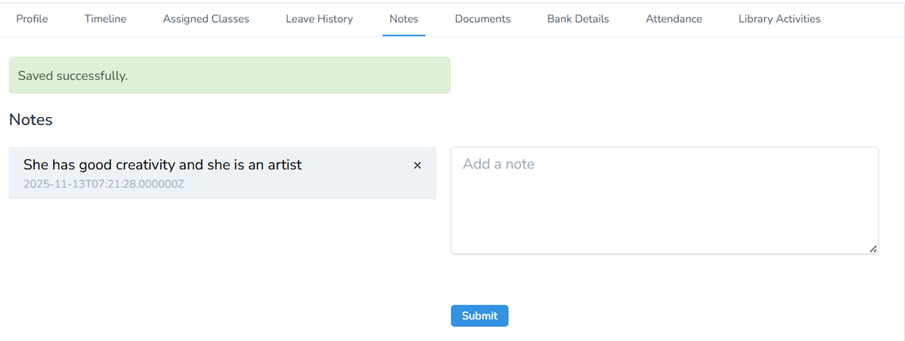
Notes
Section for internal remarks or HR notes. These notes are only visible to admin-level users.
Documents
Allows uploading and storing essential teacher documents such as certificates, ID proofs, appointment letters, contracts, etc.
Click Add on the top-right corner to upload teacher-related documents. You can:
-
Add certificates
-
Upload ID proofs
-
Attach appointment/experience letters
-
Upload any other supporting documents
After selecting and uploading the required files:
-
Click Submit to save the documents
-
The uploaded files will be successfully stored and displayed in the teacher’s profile for future reference. Allows uploading and storing essential teacher documents such as certificates, ID proofs, appointment letters, contracts, etc.


Bank Details
Used to store salary processing information such as bank account number, IFSC, branch, and other payment-related details.
Click Add on the top-right corner to enter the teacher’s bank information. You can:
-
Add bank account number
-
Enter IFSC code
-
Specify bank name and branch details
-
Provide any additional salary-related banking information
After filling in the details:
-
Click Submit to save
-
The bank details will be securely stored and displayed in the teacher’s profile for future payroll processing. Used to store salary processing information such as bank account number, IFSC, branch, and other payment-related details.


Attendance
Displays the teacher’s monthly attendance records, including present days, leave, and late entries.

Library Activities
Shows the teacher’s library usage such as borrowed books, return dates, overdue alerts, and book history. The admin can check the library activities such as issue date , return date and status of the book taken from the library
These tabs help provide a complete, well-organized record of each teacher within the institution’s system.

Additional Actions Available in Teacher Profile
When viewing a teacher’s complete profile, administrators have access to several important action buttons for managing account status, verification, and credentials.
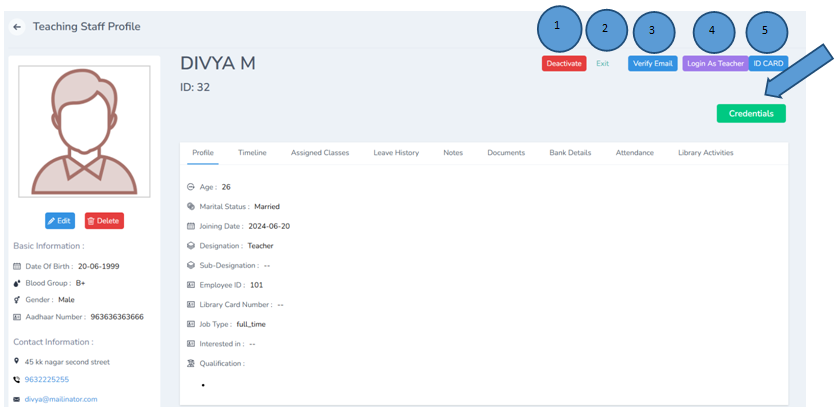
1.Deactivate
-
Click Deactivate to disable the teacher’s account without permanently deleting it.
-
Change the status to OK if you want to deactivate
-
Helpful when a staff member resigns, goes on long-term leave, or is temporarily inactive.
-
The teacher will no longer be able to log in after deactivation.


2.Exit
-
Click Exit to permanently exit the teacher’s account.
-
Change the status to OK if you want to exit the teacher
-
Allows the admin to exit the current profile view and return to the main teacher list.
-
Useful for quick navigation.

3.Verify Email
Click verify email to the teacher’s registered email address.
-
Sends a verification email to the teacher’s registered email address.
-
Ensures the email is active and valid for communication and login recovery.
-
Status updates once the teacher verifies the email.

4.Login as Teacher
-
Allows the admin to temporarily log in as the teacher by clicking Login as Teacher
-
The teacher’s dashboard will be opened
-
Useful for checking issues, verifying dashboard access, or troubleshooting user complaints.
-
All actions performed are logged for security.


5.ID Card
-
Generates or displays the teacher’s digital ID card.
-
Can be downloaded or printed for school records.
-
Includes essential staff identification details.
6.Credentials
-
Provides access to the teacher’s login credentials.
-
Allows the admin to view or regenerate the username and password.
-
Useful for onboarding or assisting teachers who forget their login details


1.How to Add a Non Teaching Staff
There are various categories of non-teaching staff in the school, and the same procedure applies to all non-teaching staff members.
Menu Path
Users → Staff → Non-Teaching
Steps
-
Log in with your Admin credentials.
-
From the left menu, go to Users.
-
Click on Staff.
-
Select Non-Teaching.
-
A new tab will open showing the list of non-teaching staff.
-
Click the Add (+) button to create a new non-teaching staff profile.

1.1.How to Add an Accountant
Menu path
Users ----Staff ----Non teaching ----- Add

1.2. Fill in Basic Profile Details
Once you click Add, a new staff creation form opens.
Enter the Required Details
- Name
- Mobile Number
- Email ID (This will be used as the Login Username)
- Designation → Select Accountant
After entering all the details, click Submit.
1.3 Add Educational Qualification
Once the basic details are saved:
-
A new tab Educational Qualification will open.
-
Enter all qualification details such as:
- UG Degree
- PG Degree
- Subject Specialization etc
- Click Submit to proceed.
1.4 Add Notes (Optional)
The next tab shows the Notes section.
-
Enter any internal notes related to the staff (optional).
-
Click Submit to move to the next step.
1.5 Add Address Details
A new tab labelled Address will appear.
-
Enter the complete address of the accountant.
-
Review the details.
-
Click Submit.
Once this final section is completed, the accountant’s profile is fully created.
2. Login Credentials Creation
After all steps are completed, GegoK12 automatically generates the login credentials for the Accountant. Default Login Credentials
- Username: The Email ID entered during staff creation
- Password: password (A default password)
Note:
The Accountant can change this password later from the profile settings.
The ID card can be generated and printed from the admin’s profile
3. Completion
The Accountant login is now successfully created, and the staff can access the Accountant Module with the generated credentials.
Additional modules
From the Accountant’s profile page, the admin can
- Edit Profile
- Delete Profile
- View Profile
- View timeline
- Add Notes
- Upload Documents
- Record Bank Details
The Accountant can login with the credentials given by the Admin
Login Id: The mail id given by the Admin
Password: Password(By default)
The password can be changed later by the accountant in the accountant’s profile

The accountant can view the unpaid fee by clicking on to it

The accountant can schedule the structural and other fee

To know more details about accountant module click Account management
Open the Account Management Guide
4. Creating a Receptionist (Admin Guide)
4.1 Navigate to Non-Teaching Staff
Menu Path:
Users → Staffs → Non-Teaching Staff
Click Add New Staff to begin creating the profile.
Step 1: Go to users ---- Staffs ---- Non Teaching
4.2 Fill Basic Profile Details
A staff creation form will open. Enter all required information such as:
- Name
- Mobile Number
- Email (Used as Login ID)
- Designation → Receptionist
Click Submit to move to the next tab.
Note: Email ID is mandatory. It becomes the Receptionist’s login username.
4.3 Add Educational Qualification
Fill in the relevant qualification details and click Submit.
4.4 Add Notes
Add any internal notes related to the receptionist profile.
Click Submit.
4.5 Enter Address
Add communication and permanent address information.
Click Submit to complete the creation process.
4.6 Login Auto-Creation for Receptionist
Once all steps are completed, GegoK12 automatically creates the login credentials:
- Username: Email entered by the admin
- Password: password (Receptionist can change it later)
- The receptionist can later update their password using Change Password inside their dashboard.
4.7 Additional Admin Controls
From the receptionist’s profile page, the admin can:
-
Edit Profile
-
Delete Profile
-
View Timeline
-
Add Notes
-
Upload Documents
-
Record Bank Details

Check Timeline
Step 8: The timeline shows the list of activities in the receptionist profile
Enter Notes
Step 9: Any important details about the profile can be recorded here. Once done click submit
Upload Documents
Step 10: Click Documents and add the documents for future use by clicking the add button and click submit.
Enter Bank Details
Step11: Bank details can be added here for the future use by clicking the Add button
Once the admin creates the receptionist login the receptionist can login in the portal login with Mail Id as the given mail id during the form craetion and password as password. The password can be changed if required by using change password.
The password can be changed from the receptionist login by clicking change password

Link – You can click the given link to know “How to Login as a receptionist”
Open the Reception Management Guider
-
Username: Email entered by the admin
-
Password: password (Receptionist can change it later)
The ID card can be generated and printed from the admin’s profile

5.How to Add the librarian?
5.1.Navigate to Non-Teaching Staff
Menu Path:
Users → Staffs → Non-Teaching Staff
Click Add New Staff to begin creating the profile.
Step 1: Go to users ---- Staffs ---- Non Teaching
5.2 Fill Basic Profile Details
A staff creation form will open. Enter all required information such as:
-
Name
-
Mobile Number
-
Email (Used as Login ID)
-
Designation → Librarian
Click Submit to move to the next tab.
Note: Email ID is mandatory. It becomes the Librarian’s login username.
5.3.Add Educational Qualification
Fill in the relevant qualification details and click Submit.
5.4.Add Notes
Add any internal notes related to the receptionist profile.
Click Submit.
5.5. Enter Address
Add communication and permanent address information.
Click Submit to complete the creation process.
The ID card can be generated and printed from the admin’s profile
Login Auto-Creation for Librarian
Once all steps are completed, GegoK12 automatically creates the login credentials:
-
Username: Email entered by the admin
-
Password: password ( can change it later)
-
The librarian can later update their password using Change Password inside their dashboard.
Link – You can click the given link to know “ The working of library management”
Open the library management Guider